Hello to my followers,
Since my last post there have been some complications in my world. As it turns out I am expendable and was laid off my full time job. Now days I spend my time looking for work and thinking about what to do with my life, and after 5 weeks of sitting at home thinking, I have realized one thing, I have no Idea what it is that I want to do with my life. So this post is an update, but my next one will be a short story.
At the end of summer I took on the large task of taking out 2 very large single pain picture windows and reframing about 17 feet of exterior wall and putting in a new double hung window and a patio door, I have been taking pictures of the fun stuff I found that was wrong in the first place but my camera died near the end of the project so the is a gap in the pictures. Enjoy.
please come back soon as I will be writing more often.
Thursday, December 3, 2009
Monday, September 21, 2009
Wine making 8th post
Hello and welcome back,
This is just an update about how the wine is progressing.
The raspberry wine which was started back in May and June is getting close to bottling time, it has taken on a nice ruby red color, very clear and stable as far as flavor goes, the wine had a taste of SO2 gas which was absorbed by the wine due to pressure inside the jug during the end of the fermentation process.
The next step is to degass the wine and let it settle, since I didn't have the proper wand for my drill, I shook the wine in the jug to get it to fizz,(think a race car driver shaking champagne after a race, but not shooting wine all over my kitchen), then let it settle, and repeat, do this until the wine doesn't fizz anymore( like 3 day old beer). this releases the traped gas and calms the wine, there was a dramtic difference in flavor after I let it sit 15 min after degassing. The degassed wine is known as still wine, the opposite is known as sparkling wine.
I am still getting sediment on the bottom so I am continuing to rack, the last rack I added 1 campden tablet per gallon and 1/2 tsp per gallon of potassium sorbate with 1/3 cup of cooked sugar, this is all dissovled into the wine to sweeten. The campden and potassium are what keep the wine from restarting fermentation, I don't need it to be any more alcoholic, also I have read that using the 2 chemicals together works much better than either one alone, so I add them and now I have to wait and see.
Both raspberry wines (1st and 2nd batch) have taken on a similar color and flavor, it seems that the farther in the process we go the more they seem to be the same, I have gotten all my wine on the same rotation with racking so now once every two months I have 3 gallons of wine to rack.
And the rubarb wine,
I have tasted some of this already and I think once it settles it will be very good, It has a light crisp flavor with tones of citrus, strange considering rubarb is not considered a citrus fruit, but it has a little bite right now, its still to young for a dinner drink, once it has aged a year it will be very good. I happen to have some extra after racking so I filled a regular wine bottle sweetened it to over come the bite and put it in the fridge, my wife and I are drinking it 1 glass at a time.
I know there are a few people that want to taste these creations, I will have a wine tasting once they are ready, In the mean time keep reading my blog and let me know of any flavors you want me to try.
next few projects:
installing a patio door
installing a new construction window
insulating an exterior wall
drywalling
making hard cider with pears
before winter I am going to try a cherry wine
I also want to make a basic white grape wine
so come back soon for more updates
thanks for reading
Wednesday, August 26, 2009
wine making 7th post
Hello and welcome back,
I spent a little time at the wine making store asking questions about wine and trying to figure out what happened, as it turns out I did a few things wrong, well not wrong specifically, I made beginner mistakes.
First I used the wrong yeast, as a beginning wine maker this is something that I need to learn different wine ingredients different wine yeast.
Second I tried to just pitch the yeast and pray that it would get started on its own, now this works with many different wines but Rhubarb wine is very finiky and takes a special touch to make it work. You can read about it below.
Third, I did things according to a recipe that I found, and like I have said before a recipe is only a guideline, so I have developed my own recipe I will include that receipe below.
And so with all this new knowledge that I found I decided to try it again, so here we go.
here is the Recipe.
Starter solution:
1tsp sugar
1/8 tsp nutrient
1 cup warm water (between 80 and 100 degrees)
¼ cup of must
yeast
7. let starter solution sit for 30 min then add another ¼ cup of must
8. let starter sit for another 1 hour and add ½ cup of must
9. let starter sit for another 2 hours then add 1 cup of must
10. Let start sit for 12 hours and add 2/3 of the starter to the must, pour the starter onto a spoon slowly so the starter will stay near the surface.
11. Mix another ¼ cup of must with the left over starter solution and set aside.
12. Wait 12 hours and check the must for bubbling, if fermentation has started mix the rest of the starter in the must if not remake starter add balance of yeast and repeat steps 7 through 11.
13. after fermentation has started mix 1 ½ lbs of sugar into half the amount of water and cook till sugar is dissolved, set aside and let cool to below 100 degrees
14. Add glucose to primary and stir in.
15. check SG starting should be 1.095 or 1.100
16. let sit until sg reaches 1.040 then rack
17. stop fermentation at 1.001 with 1 campden tablet per gallon and rack again
18. Rack every 2 months until wine clears after 6 months stabilize with a wine stabilizer sweeten to taste and bottle. You can drink after 3 months but it mellows with time.

Here is the wine yeast that I used, apparently this is the wine that works for wine that is very hard to start, this is also good for stuck fermentations. This yeast is recommended for Rhubarb wine.

On the side of the bucket I have drawn a line for 1 gal and 1gal plus 1 750ml bottle, I like to ferment these sided by side and use it to top up the 1 gal carboy. These lines are for liquid only so when the pulp is added the liquid level will be much higher.

This is a picture of the wine 2 days after it started fermenting, as you can see there is a layer of foam on the surface this is a good sign that the fermentation is well under way.
So there it is, this is the method and recipe I am using I have no Idea how it will taste because I am not at that point yet.
Today I have 2 gallons of raspberry wine at the 3 month mark in another month I will be able to add stabalizer to them and rack again for another 2 months.
I also have my first batch of rhubarb wine well under way in the first week of fermentation.
So stay tuned and I am sure you will learn something.
I spent a little time at the wine making store asking questions about wine and trying to figure out what happened, as it turns out I did a few things wrong, well not wrong specifically, I made beginner mistakes.
First I used the wrong yeast, as a beginning wine maker this is something that I need to learn different wine ingredients different wine yeast.
Second I tried to just pitch the yeast and pray that it would get started on its own, now this works with many different wines but Rhubarb wine is very finiky and takes a special touch to make it work. You can read about it below.
Third, I did things according to a recipe that I found, and like I have said before a recipe is only a guideline, so I have developed my own recipe I will include that receipe below.
And so with all this new knowledge that I found I decided to try it again, so here we go.
here is the Recipe.
- Rhubarb Wine (1 GAL)
Ingredients:
4 lbs rhubarb (chopped and frozen prior to use)
3 lbs of sugar
7 qts of water (or enough to make 1 gal plus 1 extra 750ml
Bottle)
1 campden tablet
1 tsp yeast nutrient
¼ tsp tannin
1 packet Lalvin K1-V1116 yeast
Method
1. Put frozen and chopped rhubarb in primary cover with 1 ½ lbs of sugar (half the sugar) then wait 24 hours and stir.
2. Pour 6 qts of hot water over mixture, stir and scoop rhubarb into a nylon straining bag, and set aside in a bowl.
3. Add campden tablet crushed, pectic enzyme, tannin and mix well, place straining bag back in primary and let side for 24 hours minimum.
4. Measure SG and record. remove pulp and discard, check the liquid level is where you want it.
5. Add yeast nutrient dissolved in 1 cup water and mix into primary.
6. make up starter solution
Starter solution:
1tsp sugar
1/8 tsp nutrient
1 cup warm water (between 80 and 100 degrees)
¼ cup of must
yeast
7. let starter solution sit for 30 min then add another ¼ cup of must
8. let starter sit for another 1 hour and add ½ cup of must
9. let starter sit for another 2 hours then add 1 cup of must
10. Let start sit for 12 hours and add 2/3 of the starter to the must, pour the starter onto a spoon slowly so the starter will stay near the surface.
11. Mix another ¼ cup of must with the left over starter solution and set aside.
12. Wait 12 hours and check the must for bubbling, if fermentation has started mix the rest of the starter in the must if not remake starter add balance of yeast and repeat steps 7 through 11.
13. after fermentation has started mix 1 ½ lbs of sugar into half the amount of water and cook till sugar is dissolved, set aside and let cool to below 100 degrees
14. Add glucose to primary and stir in.
15. check SG starting should be 1.095 or 1.100
16. let sit until sg reaches 1.040 then rack
17. stop fermentation at 1.001 with 1 campden tablet per gallon and rack again
18. Rack every 2 months until wine clears after 6 months stabilize with a wine stabilizer sweeten to taste and bottle. You can drink after 3 months but it mellows with time.

Here is the wine yeast that I used, apparently this is the wine that works for wine that is very hard to start, this is also good for stuck fermentations. This yeast is recommended for Rhubarb wine.

On the side of the bucket I have drawn a line for 1 gal and 1gal plus 1 750ml bottle, I like to ferment these sided by side and use it to top up the 1 gal carboy. These lines are for liquid only so when the pulp is added the liquid level will be much higher.

This is a picture of the wine 2 days after it started fermenting, as you can see there is a layer of foam on the surface this is a good sign that the fermentation is well under way.
So there it is, this is the method and recipe I am using I have no Idea how it will taste because I am not at that point yet.
Today I have 2 gallons of raspberry wine at the 3 month mark in another month I will be able to add stabalizer to them and rack again for another 2 months.
I also have my first batch of rhubarb wine well under way in the first week of fermentation.
So stay tuned and I am sure you will learn something.
Thursday, August 20, 2009
Wine making 6th post
Hello and welcome back,
Last week I decided to try and make up a batch of rhubarb wine, I sort of combined 2 recipes together to make up my batch.
I first took 4 lbs of frozen rhubarb and 2 lbs of sugar and mixed it together in my Primary and waited 24 hours, the sugar helped to extract the juice from the , now thawed, rhubarb and created a sugary slurry in the bottom of the primary.
after the 24 hours I put all the rhubarb in a straining bag so I could squeeze the rest of the juice from it and add that to the must. after this process I had about 1/3 of a gal of liquid.
I added enough water to make up 1 gal and 1 750 ml bottle, I find that fermenting these side by side when I rack the gal I can top up with the 750 ml bottle, this way I am not adding water to the wine and diluting it.
I added the water, 1 crushed campden tablet, pectic enzyme, and enough sugar to bring the sg to 1.100, I then put the rhubarb in the straining bag back in the primary for another 24 hour period.
After 24 hours, I again pulled out the rhubarb squeezed what I could out of it added the juice to the must and discarded the pulp. I dissolved the yeast nutrient and added the yeast.
after 24 hours again there was nothing, no bubbling, no fizzing, no nothing, It smelled good though, I tested the sg and still at 1.095.
The fermentation did not take, so I decided to make up a starter of warm water, glucose (sugar cooked with water and dissolved) and 1/4 cup of the must, I then added the yeast to it and waited.
Again nothing, I was reading that if there is too much sugar to start with sometimes the yeast can't get started so I decided to cut the must in half and fill with straight water, I tested the sg and it was around 1.040 so I decided to pitch the yeast again and wait another 24.
Still nothing, now I am just frustrated, so back to the internet for more research, I found an article that talked about the yeast needing a lot of air in the beginning, I am using a bucket for a primary so there should be plenty of air, but I thought maybe I should stir this up a bit and see what happens, I poured the must into a sanitized carboy and then back into the primary this created lots of bubbles So I thought it may have worked, after another 24 hours,
still nothing, the bucket was calm and once again the fermentation didn't take.
I am now past 5 days since I started this endeavor, and frustrated that I wasted sugar and yeast on this batch, but I am thinking it is time to shut this one down, I dumped out what I have cleaned up everything, and now I need to go over my notes and find out what I did wrong. I will add pictures soon for anyone who is still reading.
come back soon.
Last week I decided to try and make up a batch of rhubarb wine, I sort of combined 2 recipes together to make up my batch.
Ingredients:
5 lb rhubarb
6  pts water
2.5 lb Sugar
0.25 tsp Tannin
1 tsp Nutrient
1 Campden tablet, crushed
1 pkg Wine Yeast

O.G. 1.095-1.100
Procedure:
Place chopped rhubarb and sugar in fermenter. Mix well. Cover w/plastic sheet for 24 hrs. Crush rhubarb. Pour HOT water over the crushed rhubarb and stir vigorously. After a bit, scoop the rhubarb into a straining bag and squeeze as much of the juice out as possible.
Discard the pulp. Add the next 4 ingredients. Check and adjust (if necessary) the gravity of the must (should be 1.110) Check and adjust (if necessary) the temperature (should be 75 deg F). (The recipe doesn't say to, but it seems to me that you should wait 24 hrs before adding the yeast so the Campden tablets don't kill it too). Ferment at 75 deg F, until sg is at 1.040 then rack to secondary, ferment @ 65 deg F,until sg is at1.000 then add 1 crushed campden to stop fermentation then rack again, etc., until clear. Bottle. Age 6 months. Bottle.
I first took 4 lbs of frozen rhubarb and 2 lbs of sugar and mixed it together in my Primary and waited 24 hours, the sugar helped to extract the juice from the , now thawed, rhubarb and created a sugary slurry in the bottom of the primary.
after the 24 hours I put all the rhubarb in a straining bag so I could squeeze the rest of the juice from it and add that to the must. after this process I had about 1/3 of a gal of liquid.
I added enough water to make up 1 gal and 1 750 ml bottle, I find that fermenting these side by side when I rack the gal I can top up with the 750 ml bottle, this way I am not adding water to the wine and diluting it.
I added the water, 1 crushed campden tablet, pectic enzyme, and enough sugar to bring the sg to 1.100, I then put the rhubarb in the straining bag back in the primary for another 24 hour period.
After 24 hours, I again pulled out the rhubarb squeezed what I could out of it added the juice to the must and discarded the pulp. I dissolved the yeast nutrient and added the yeast.
after 24 hours again there was nothing, no bubbling, no fizzing, no nothing, It smelled good though, I tested the sg and still at 1.095.
The fermentation did not take, so I decided to make up a starter of warm water, glucose (sugar cooked with water and dissolved) and 1/4 cup of the must, I then added the yeast to it and waited.
Again nothing, I was reading that if there is too much sugar to start with sometimes the yeast can't get started so I decided to cut the must in half and fill with straight water, I tested the sg and it was around 1.040 so I decided to pitch the yeast again and wait another 24.
Still nothing, now I am just frustrated, so back to the internet for more research, I found an article that talked about the yeast needing a lot of air in the beginning, I am using a bucket for a primary so there should be plenty of air, but I thought maybe I should stir this up a bit and see what happens, I poured the must into a sanitized carboy and then back into the primary this created lots of bubbles So I thought it may have worked, after another 24 hours,
still nothing, the bucket was calm and once again the fermentation didn't take.
I am now past 5 days since I started this endeavor, and frustrated that I wasted sugar and yeast on this batch, but I am thinking it is time to shut this one down, I dumped out what I have cleaned up everything, and now I need to go over my notes and find out what I did wrong. I will add pictures soon for anyone who is still reading.
come back soon.
Monday, July 27, 2009
Wine making 6th post
Hello and welcome back, I was camping for 4 days so it has been a little while since I have posted.
 This is shot of the sediment that was left after I siphoned the wine into a clean jug aka racking.
 Here is a shot of the 2 jugs, after I racked it, as you can see the bottle on the right is the sediment and the bottle on the left is the wine after I racked, you can see there is no sediment, yet. Before I rack again there will be a significant layer again.

Here you can see the first and second batch side by side, the flavor is almost the same but as you see there is a big difference in color. But I do think they will both be equally as fun to drink.
Next week I will be attempting rhubarb wine, I am going to make several varieties of rhubarb wine;
1. straight rhubarb
2. rhubarb and grape
3. rhubarb and cherry
4. rhubarb and strawberry
I will be making about 1 gallon of each to start and see which of these taste the best, I will then go for my first 5 gallon batch of wine. but for now 1 gallon batches will be my thing.
Last week (7/17) I was able to rack the first jug of wine, now I have 2 months before I have to do it again. The color looks very deep red almost to a ruby color, the SG is 0.990 which is right were it is supposed to be. As it continues to sit, it will continue to clear. 
The layer at the bottom is made up of dead yeast, fruit pulp, and other particles which make the wine cloudy. This over time should settle out.
This is shot of the sediment that was left after I siphoned the wine into a clean jug aka racking.The second batch was racked to the secondary( please review my language post for definitions) on 7/17 so I still have a few more days before I have to rack that one again.
 Here is a shot of the 2 jugs, after I racked it, as you can see the bottle on the right is the sediment and the bottle on the left is the wine after I racked, you can see there is no sediment, yet. Before I rack again there will be a significant layer again.
Each time I rack there should be less and less sediment.

Here you can see the first and second batch side by side, the flavor is almost the same but as you see there is a big difference in color. But I do think they will both be equally as fun to drink.
Next week I will be attempting rhubarb wine, I am going to make several varieties of rhubarb wine;
1. straight rhubarb
2. rhubarb and grape
3. rhubarb and cherry
4. rhubarb and strawberry
I will be making about 1 gallon of each to start and see which of these taste the best, I will then go for my first 5 gallon batch of wine. but for now 1 gallon batches will be my thing.
Stay tuned and you will undoubtedly learn something.
Tuesday, July 14, 2009
Wine making 5th post
Hello and welcome back.
I have updated the last post with pictures so all of you that are following can understand what I am doing and what tools I am using, I have also included a link to a site that I visit frequently for advice and recipes.
Over the weekend, besides adding pictures to the last post, I tested the second batch in the primary and found it was time to rack to the secondary, (siphon from the bucket to a glass jug) the SG (specific gravity) was at 1.030.
The second batch has taken a little longer to ferment to this level, I believe it is because there aren't as many nutrients in the left over must (pulp and juice from the first batch) to effectively feed the yeast, I had to add yeast and yeast nutrient half way through the fermentation process to keep it going. It was a nail biter for a little while but it seems to have pulled through.
If you look at the pictures from my last post you will see a picture of two jugs one darker than the other, the darker jug was the first batch the lighter color jug is the 2nd batch, both taste good however the color and the flavor is a little lighter in the second batch.
The first batch has been in secondary for about 10 days now, and there is about a 1 inch layer on the bottom of sediment, this sediment called LEES, is the pulp from the fruit and dieing yeast, this is also how the wine clears, It will still be months before I am ready to bottle but these are good signs of things to come. I have not yet tested the 1st batch as far as SG goes but next week I will rack (siphon from one jug to another and refit airlock) again and test it. I will let you all know how it is coming.
The second batch is still fizzing and was just racked to the secondary so it will be about 2 weeks before I open it again.
I have 2 wine bottles that I also filled with must to ferment along side the gallon jugs, these wine bottles you can see in the pictures from my 4th post are going to be used to "top up" (fill the gallon jugs to the top after racking) when you rack from one jug to another you loose some of the total volume because the pulp and dead yeast also have volume, so when you rack to another jug you leave the solids behind and therefore have less liquid volume in the second jug so you need to add liquid to TOP UP. Some people use distilled water for this which thins the wine just a bit, but since I had extra wine to begin with, I will be using wine to top up.
After I rack again it will be 2 months before I have to do it again, so in the mean time I am looking at starting a batch of rhubarb wine and I have a few more projects that I will be starting around my house so stay tuned.
Friday, July 10, 2009
Wine making 4th post
Ok, I have received a few comments from the non-wine making crowd about all the terms that I have tossed around about wine making. So here is the rundown on the process and procedure of wine making. If you are interested in trying your own wine here is a website that I have visited many time to learn more: http://winemaking.jackkeller.net/basics.asp
First a few basic terms and definitions.


a primary - a food grade plastic bucket (left)where the fruit, water and preservatives (right) are mixed and the initial fermentation is started. A primary can be any size, I currently have a 2 gallon bucket which will yield about 1 to 1/2 gals of wine per batch, there are 6 gal primary's and for the commercial winemaker 100 + gals tanks.

A secondary - a glass or plastic bottle 1 gal or more also known as a carboy I use glass because it does not seep flavors into the wine, the liquid from the primary is siphoned off the pulp and into the secondary (carboy), fermentation is continued for 2 months to a year before bottled.
must - the mixture of pulp and liquid in the primary
 Specific gravity or SG - SG is the measure of how much sugar is mixed into the primary, water has an SG of 1.000, in wine making, we want to mix enough sugar into the mix to have a starting SG of 1.095, this is a magic number that ferments to an alcohol % of about 12.
Different fruits have different sugar contents, So the amount of sugar added is different for every recipe and different for the same fruit from year to year due to humidity, sun, rain and other environmental conditions. That is why recipes that you find online or in books can not be followed exactly, you have to measure and adjust the sugar as you go to work with what fruit you have. but with this process you can ferment nearly anything into wine, I have even heard about a chocolate strawberry wine that turned out pretty good. above is a picture of a test tube which is filled with wine and tested using a hydrometer.
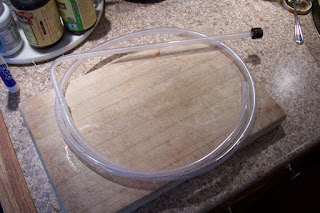 siphon tube - 3 ft plastic piece of clear food grade hose that is used to move the wine from the primary to the secondary or from one carboy to another, think of someone stealing gas except that you swallow some wine not a deadly toxin, unless you don't stop drinking the wine through your big plastic straw but that is another topic all together.

racking (left) - is the process of siphoning liquid from one container to another, for instance siphoning wine from one carboy to another then setting it back on the "RACK" for another two months. and racking is done every 2 to 3 months until the wine becomes clear.

An Airlock( left) - A double chamber airlock is attached to a cork and filled with water, it lets the CO2 the yeast produce escape without letting air in.
 yeast (left) - the living organisms that turn the sugar into alcohol. These little miracle workers have the greatest job, Eat sugar all day until you die. What we drink is the waste from the yeast, I bet you all wanted to know that.
 Hydrometer (left) - An instrument for measuring the specific gravity relative to sugar content of a liquid, these are used in salt water fish tanks as well to measure the salt content in the tank. it looks a little like long skinny glass bobber.
stay tuned any you will undoubtedly learn something. And who doesn't want to learn about making alcohol?
thanks for reading
First a few basic terms and definitions.


a primary - a food grade plastic bucket (left)where the fruit, water and preservatives (right) are mixed and the initial fermentation is started. A primary can be any size, I currently have a 2 gallon bucket which will yield about 1 to 1/2 gals of wine per batch, there are 6 gal primary's and for the commercial winemaker 100 + gals tanks.

A secondary - a glass or plastic bottle 1 gal or more also known as a carboy I use glass because it does not seep flavors into the wine, the liquid from the primary is siphoned off the pulp and into the secondary (carboy), fermentation is continued for 2 months to a year before bottled.
must - the mixture of pulp and liquid in the primary
 Specific gravity or SG - SG is the measure of how much sugar is mixed into the primary, water has an SG of 1.000, in wine making, we want to mix enough sugar into the mix to have a starting SG of 1.095, this is a magic number that ferments to an alcohol % of about 12.
Different fruits have different sugar contents, So the amount of sugar added is different for every recipe and different for the same fruit from year to year due to humidity, sun, rain and other environmental conditions. That is why recipes that you find online or in books can not be followed exactly, you have to measure and adjust the sugar as you go to work with what fruit you have. but with this process you can ferment nearly anything into wine, I have even heard about a chocolate strawberry wine that turned out pretty good. above is a picture of a test tube which is filled with wine and tested using a hydrometer.
 siphon tube - 3 ft plastic piece of clear food grade hose that is used to move the wine from the primary to the secondary or from one carboy to another, think of someone stealing gas except that you swallow some wine not a deadly toxin, unless you don't stop drinking the wine through your big plastic straw but that is another topic all together.
racking (left) - is the process of siphoning liquid from one container to another, for instance siphoning wine from one carboy to another then setting it back on the "RACK" for another two months. and racking is done every 2 to 3 months until the wine becomes clear.

An Airlock( left) - A double chamber airlock is attached to a cork and filled with water, it lets the CO2 the yeast produce escape without letting air in.
 yeast (left) - the living organisms that turn the sugar into alcohol. These little miracle workers have the greatest job, Eat sugar all day until you die. What we drink is the waste from the yeast, I bet you all wanted to know that.
 Hydrometer (left) - An instrument for measuring the specific gravity relative to sugar content of a liquid, these are used in salt water fish tanks as well to measure the salt content in the tank. it looks a little like long skinny glass bobber.
stay tuned any you will undoubtedly learn something. And who doesn't want to learn about making alcohol?
thanks for reading
Thursday, July 9, 2009
Wine making 3rd post
Ok, so yesterday I came checked the wine and noticed that the first batch that I had moved to the secondary is still bubbling alot and the second batch which is still in the primary is slowing down.
I decided to take some measurements:
Batch1:
7/2/09 starting SG 1.100
7/7/09 racked to secondary at SG 1.030
7/9/09 still bubbling good.
batch 2:
7/7/09 starting SG 1.095
7/9/09 SG of 1.060
bubbling has slowed down a little but I'm not worried.
I am looking toward my next batch, I think I will try a Rhubarb wine, I have 20 plus LBS in my chest freezer and it should get used soon because I have more rhubarb ready to be picked.
thanks for looking.
Tuesday, July 7, 2009
Wine making 2nd post
Hello and welcome back,
I was gong to wait another day to rack to the secondary but when I got home I check the specific gravity and it was at 1.030 so it was time to rack.
I racked 1 gal into a clean and sanitized 1 gal carboy and refit air lock on carboy, In the primary I still had about 1/2 gal of must to do something with, It was too much to rack into wine bottles for further fermentation, and not enough for another 1 gal carboy, I guess this is the reason most seasoned wine makers have many different sizes of carboys available.
I decided that I could make up another 1/2 gal of sugar water and add it to the existing must, I adjusted the SG to 1.095 and refit the airlock on the primary for a second batch.
This batch will be a little weaker, I think, but it should still be drinkable in the end. So instead of making 1 batch now I am making 2, I guess this means another trip to the wine store for more supplies. keep reading.
Monday, July 6, 2009
Wine making 1st post
Hello and welcome to my wine making post.
One day about 6 months ago I got the crazy idea in my head to start making wine, I don't know where it came from or why, but the feeling was strong and since I am a taurus there was no stopping me.
I did my research, gathered the proper tools, and found a recipe that looked easy below is the recipe/guide line that I used for my first batch. I say guide line because the recipes can not be followed to the letter because different climates produce different sugar contents in the fruit you are using.
I happen to have a wine and beer making shop 3 blocks from my house so it is easy if I need any last minute items.
the first day is the most exciting as you get to mix all the ingredients and sugar and water and chemicals,
RED RASPBERRY WINE
2. replace cover and wait another 24 hours and repeat
3. when specific gravity gets to 1.040 then rack into secondary
keep coming back for more updates. thanks for looking.
One day about 6 months ago I got the crazy idea in my head to start making wine, I don't know where it came from or why, but the feeling was strong and since I am a taurus there was no stopping me.
I did my research, gathered the proper tools, and found a recipe that looked easy below is the recipe/guide line that I used for my first batch. I say guide line because the recipes can not be followed to the letter because different climates produce different sugar contents in the fruit you are using.
I happen to have a wine and beer making shop 3 blocks from my house so it is easy if I need any last minute items.
the first day is the most exciting as you get to mix all the ingredients and sugar and water and chemicals,
RED RASPBERRY WINE
- 3-4 lbs fresh red raspberries
- 2-1/2 lbs finely granulated sugar
- 1/2 tsp acid blend
- 1/2 tsp pectic enzyme
- 1/8 tsp grape tannin
- 7-1/2 pints water(8pts = 1 gal)
- 1 tsp yeast nutrient
- 1 crushed Campden tablet
- wine yeast
Pick only ripe berries. mine were picked and frozen prior to using for wine. Combine water and sugar and put on to boil, stirring occasionally. Wash and de-stem berries. Put in nylon straining bag, tie, put in bottom of primary, and crush berries in bag. Pour boiling sugar-water over berries to set the color and extract the flavorful juice. Add acid blend, tannin and yeast nutrient. Allow to cool to 70 degrees F (about 4 hours or so). and add crushed Campden tablet. Cover primary with plastic wrap secured with a large rubber band. Add pectic enzyme after 12 hours and wine yeast after additional 12 hours, resecuring plastic wrap each time. Stir daily for a week, replacing plastic wrap if it looks like it needs it. Remove nylon bag and allow to drip drain about an hour, keeping primary covered as before. Do not squeeze bag. Return drippings to primary Continue fermentation in primary another week, stirring daily. Rack to secondary, top up with water and fit airlock. Use a dark secondary or wrap with brown paper (from paper bag) to preserve color. Ferment additional 2 months, then rack into clean secondary. Refit airlock and rack after additional 2 months. Wait another 2 months, rack again and bottle into dark glass. Drink after one year. This is an excellent dry wine, but don't rush it! You must ferment the full 6 months and age another year. Serve chilled.
DAY 1
I followed the recipe to the letter, I know I said not to but this was my first batch, adding all the ingredients as specified, However I did not account for the amount of time it takes for 1 gal of water to cool to 70 degrees after boiling, I mixed all the ingredients added to boiling water then sat back and let the magic happen unfortunately I started the wine later at night and after 2 hours of waiting the must was still too hot to add the campden tablet it was getting very late so I decided to use my sink to put the primary in and fill the sink with cold water while stirring the liquid, this cooled it down much faster, I don't know if it will make a difference because the boiling water is used to melt down the sugar and set the color of the raspberries, I think it will be fine, I added the campden once cooled and covered and went to bed.
DAY 2
12 hours after adding the campden tablet , I added the pectic enzyme. 12 hours later or 24 hours after the campden tablet, I added the best part about wine, the yeast, the yeast turns the sugar into alcohol. I started with a specific gravity of 1.100 so it should yield around 13% alcohol,
Days 3 and 4 are the same
1. stirThe Must is very fizzy, kind of like soda in a glass, but that means its working, my bucket is in my dining room which is attached to the kitchen. It stays about 70-75 degrees in there which I have read is the best for primary fermentation, once it gets racked into the secondary (glass carboy) then it is best at 60-65 degrees. The whole place smells like yeasty and fruity, the airlock is bubbling pretty good and the directions at this point are simple:
2. replace cover and wait another 24 hours and repeat
3. when specific gravity gets to 1.040 then rack into secondary
keep coming back for more updates. thanks for looking.
Tuesday, May 26, 2009
how to install a flower bed for $100

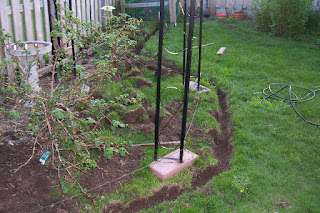
It stated with a need to clean up my yard, and the catalyst was the retired neighbor who was working on their yard.
My retired neighbor of course hired a crew to rebuild her patio and re-landscape the whole front yard; I came home from work to find this 3-man crew filling a truck with dirt. I of course wanted to do a bit of landscaping along a certain part of my fence which of course need a large amount of filler dirt, so I walked across the street and ask about the destination of the dirt they were removing from my neighbors yard. The conversation was short, as their spanglish was weak, but ultimately ended with 4 bobcat buckets full of dirt being dumped onto my driveway, this was the beginning of the flowerbed.
Step 1 planning
Take your time with this step, as it is the foundation for the results.
The flowerbed is about 4 ft by 30 ft with a 6-ft section that angles out toward the yard; this equates to about 1.6 yards of dirt, which is about 4 buckets on a bobcat. The back part of the flower bed needs 1x6’s so the dirt doesn’t push up next to the very expensive fence we had installed last year, the front will be 2 x 10’s that were nailed to 2 ft stakes that were pounded into the ground. “Yeah that should work.” I thought, after a few pencil drawings on blank paper while I was sitting at work. The plan was set.
Step 2 materials

Acquire all the materials first, you should have a good idea of material from the planning stage and do so shopping to get prices, my whole project cost under $100
1. 1x6x8 Qty 6
2. 2x4x8 Qty 4
3. 2x12x8 Qty 5
4. Exterior nails for my porter cable nail gun (the greatest tool I own)
5. A saw capable of handling treated lumber
1. 1x6x8 Qty 6
2. 2x4x8 Qty 4
3. 2x12x8 Qty 5
4. Exterior nails for my porter cable nail gun (the greatest tool I own)
5. A saw capable of handling treated lumber

6. An 8 LB mall for pounding in 2x4 stakes
7. Bubble level
8. Tape measure
9. Mason’s line or chalk line
10. Dirt lots of it. (I got this for free from a neighbor, craigslist.com is full of people giving about dirty, or wood, or landscape blocks you just need to go get them.)
11. And an assortment of other small tools that I don’t think I even used.
Step 3 action

The basic idea is to dig a trench put in the 2x10 so there is about 6 inches above the ground, pound some stakes, attach the boarder and fill with dirt.
1. This mean you have to dig in a straight line, so use a chalk line or masons line on stakes to keep you in a straight line when digging.
 3. Once the trench is dug the board is set in place and “leveled”. Cut the 2x4’s at 24 inches long and angle one end to make a point, these stakes need to be pounded down so they don’t stick out of the ground above the 2x10. Some one with good endurance is very handy here. DO NOT DIG THE HOLE for the 2x4’s this weakens the ground around the stake and it will not hold the pressure of the dirt against the 2x10’s.
1. This mean you have to dig in a straight line, so use a chalk line or masons line on stakes to keep you in a straight line when digging.
2. Once the boarder has been dug set in the 2 x 10 to make sure it fits and there is 6 inches of height along the length of the board, if not, fill under the board to raise it or dig a little more to lower it. Side note, my yard has a slope the entire length side to side so making the boards level would not work.
3. Once the trench is dug the board is set in place and “leveled”. Cut the 2x4’s at 24 inches long and angle one end to make a point, these stakes need to be pounded down so they don’t stick out of the ground above the 2x10. Some one with good endurance is very handy here. DO NOT DIG THE HOLE for the 2x4’s this weakens the ground around the stake and it will not hold the pressure of the dirt against the 2x10’s. 4. Now the stakes are pounded down the 2x10
 front boarder can be nailed to the stakes.
 Please use caution when handling power tools. I used a framing nailer with exterior ring shank nails, these nails have ridges on the shank of the nail so they don’t back out of the wood easily, screws can also be used but pilot holes should be made so when the wood dries out it doesn’t split. Make sure the board ends meet flush together and are the same height or your boarder won’t look very good.
5. As part of my project I had to put 1 x 6’s along the back part of the fence so the dirt wouldn’t touch and rot my fence, I installed the back boarder after the front boarder. I nailed up 1x6’s to the 4 x 4 fence posts that were already existing.


6. Now for the hard part, the dirt, once the boarder was nailed in all the way around, it was time to haul dirt from my driveway to the flowerbed. I used a heavy-duty wagon and 2 garbage cans to haul the dirt. This worked pretty well, but it was hard work and took a while, 2 days to be exact. Once the dirt is in place you can expect some settling so be sure to add more dirt later. In my situation, after I plant what I want I am going to put landscape fabric and wood chips on top to help the ground retain water for the plants and control weeds. 

please leave comments on my handy work or my article.


please leave comments on my handy work or my article.
Thursday, May 7, 2009
Getting started
Hello,
This is for all those that might run across my blog, this is the test blog as this is also my first blog. I will be adding more content on life, fitness, health, how to, and many more topics. I have a friend who works in video production so I'm sure you might even find some movie script information. I named this blog "Steak and Potatoes" because that is what I like and I am writing about topics I like that have a little meat in them. so bookmark the Blog spot and become a follower and I want to thank you for looking.
author.
Peter J
Subscribe to:
Comments (Atom)