Hello, and welcome back
I have been out of touch with my blog for a while, thats how it is when someone works a lot, I have been writing a few short stories and soon those will be uploaded to my blog, I also have a few projects that I will be working on this winter at my house so please keep checking back for update. thanks for reading.
Thursday, November 11, 2010
Wednesday, August 4, 2010
Wine making 9th post (final post for first batch)
Hello and welcome back,
Awhile ago I started making wine and telling the world about it. well today I have finally bottled it and started the second round of wine, this post is all about bottling.
First, bottling is easier than I thought,
simply sanitize the bottles inside and out let dry, sanitize the corks and in a surprise move steaming the corks works really well. get the wine into the bottles without spilling then cork.
the longer version:
1. soak corks and the rinse the inside of the bottles with a solution of sulfite (sodium metabisulfite) 2oz per gal of water.
2. rinse siphon tube, funnel, and any other utensils in a sanitizing solution.
3. once the bottles have been cleaned and air dried, siphon wine into bottles so it just starts up the neck.
4. I steamed the corks for 5 minutes in a steamer then soaked in solution and it worked better than soaking the corks for 2 hours or so. my corks were ready in about 20 minutes.
5. cork bottles according to corker instructions.
6. let bottles stay upright for 5-7 days then store so air bubble is at the bottom of bottle (bottle slightly downward.)
7. enjoy.
Here are the corks, 20 for 4.95, I used long term corks because I don't know how long I will save the wine before drinking, 1 month or 1 year.

I am soaking the Bottles in a solution of water and cleaner also shown, this solution removes the labels and cleans the outside of the bottles without scrubbing for $1.50 its worth it.


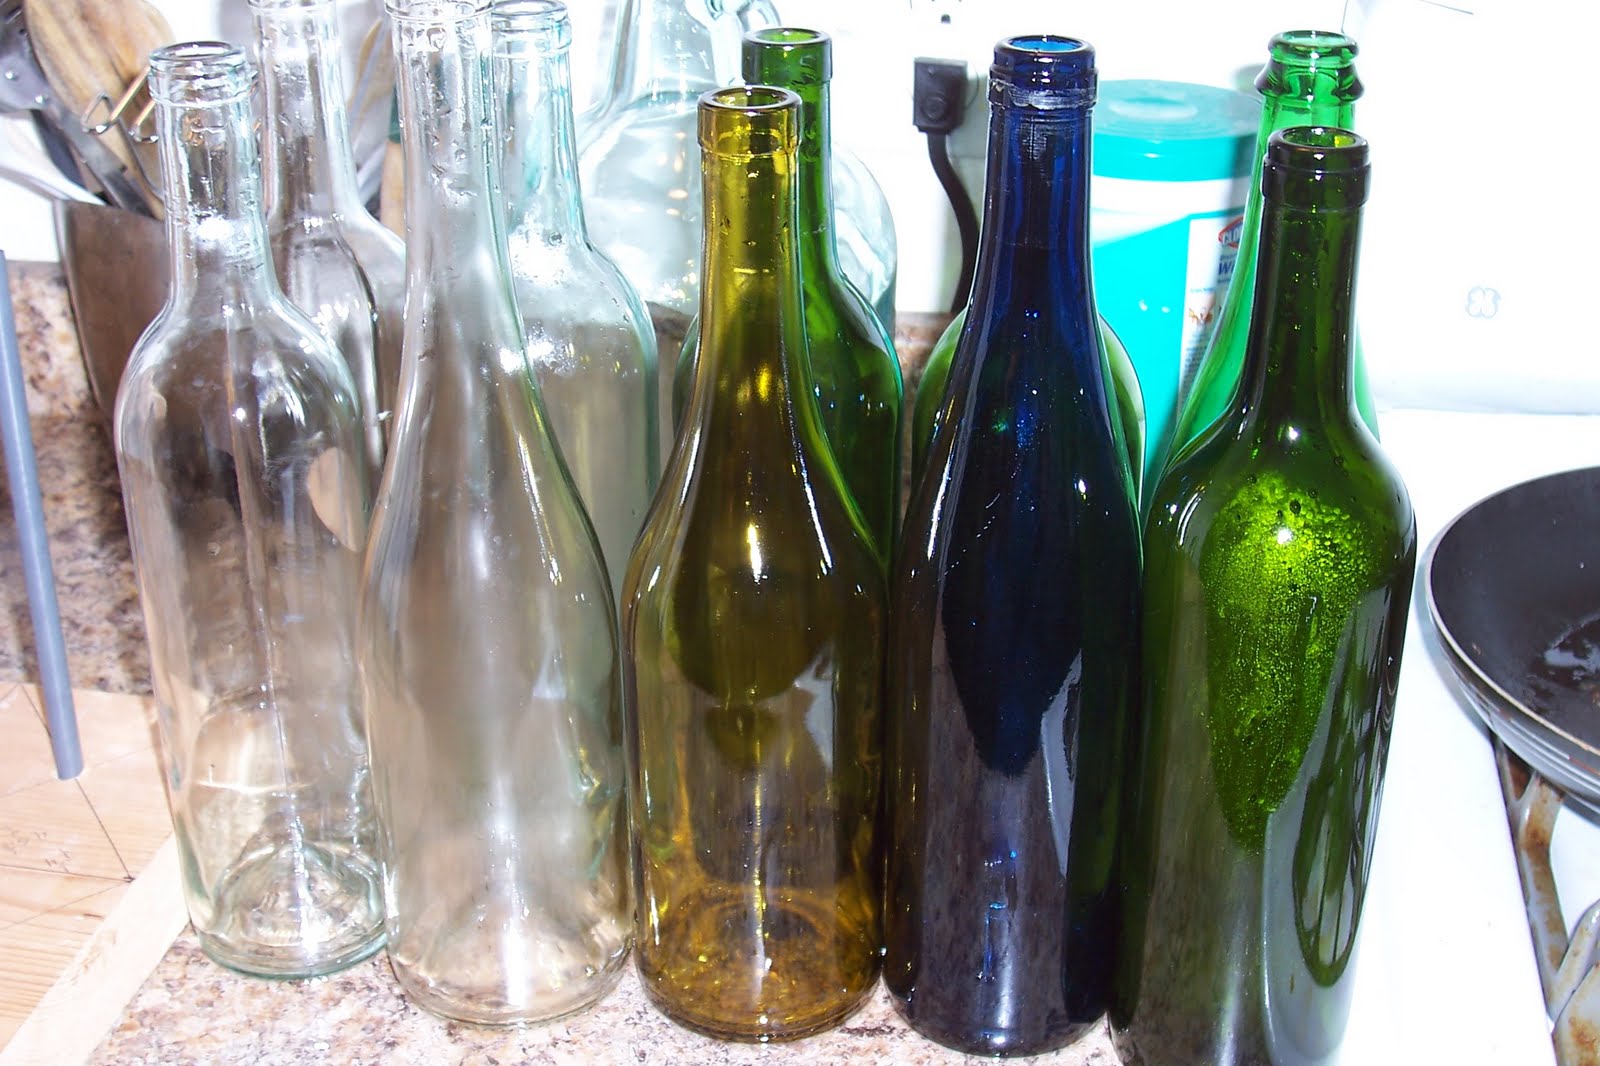
Here are the bottles cleaned and labels removed, I am color coding my wine, green bottle for my first run of raspberry wine, blue bottles for my second run of raspberry wine and clear for my rhubarb wine.

This is the corker that I used, the lady at the wine store talked me into it versus a hand corker, it was a $25 deposit and $5 per day its worth it, it took me a total of 30 min to actually fill and cork the wine bottles.

the wine to be bottled.

Here is the bottled wine, it will have to stay upright for about 5-7 days then it can be stored on its side until I am ready to drink it.

wine making has been a long and fun journey. there are many things that have to happen to make a good wine I am not sure if any of my wine will win 1st prize at any county fair but it is alcoholic and pretty good.
Thanks for reading, I am starting a new batch of rhubarb wine, I might mix it with grape juice to add body, we'll see. come back soon for more posts.
Awhile ago I started making wine and telling the world about it. well today I have finally bottled it and started the second round of wine, this post is all about bottling.
First, bottling is easier than I thought,
simply sanitize the bottles inside and out let dry, sanitize the corks and in a surprise move steaming the corks works really well. get the wine into the bottles without spilling then cork.
the longer version:
1. soak corks and the rinse the inside of the bottles with a solution of sulfite (sodium metabisulfite) 2oz per gal of water.
2. rinse siphon tube, funnel, and any other utensils in a sanitizing solution.
3. once the bottles have been cleaned and air dried, siphon wine into bottles so it just starts up the neck.
4. I steamed the corks for 5 minutes in a steamer then soaked in solution and it worked better than soaking the corks for 2 hours or so. my corks were ready in about 20 minutes.
5. cork bottles according to corker instructions.
6. let bottles stay upright for 5-7 days then store so air bubble is at the bottom of bottle (bottle slightly downward.)
7. enjoy.
Here are the corks, 20 for 4.95, I used long term corks because I don't know how long I will save the wine before drinking, 1 month or 1 year.

I am soaking the Bottles in a solution of water and cleaner also shown, this solution removes the labels and cleans the outside of the bottles without scrubbing for $1.50 its worth it.


Here are the bottles cleaned and labels removed, I am color coding my wine, green bottle for my first run of raspberry wine, blue bottles for my second run of raspberry wine and clear for my rhubarb wine.
This is the corker that I used, the lady at the wine store talked me into it versus a hand corker, it was a $25 deposit and $5 per day its worth it, it took me a total of 30 min to actually fill and cork the wine bottles.

the wine to be bottled.

Here is the bottled wine, it will have to stay upright for about 5-7 days then it can be stored on its side until I am ready to drink it.

wine making has been a long and fun journey. there are many things that have to happen to make a good wine I am not sure if any of my wine will win 1st prize at any county fair but it is alcoholic and pretty good.
Thanks for reading, I am starting a new batch of rhubarb wine, I might mix it with grape juice to add body, we'll see. come back soon for more posts.
Wednesday, June 2, 2010
installing a patio door in a dining room
Hello and welcome to my blog,
this post outlines a remodel project that I did in which I have installed a patio where a large picture window once was. This project continued to push my patience as well as my budget. As with any older home every time I would go deeper I would find more things wrong, but this was still a great weekend project.
basic tools: if you have it you will need it almost every tool I owned went into this one.
time frame: 2 weeks
this project took me one hard weekend and a few extra days for drywall and muding and sanding and painting and other finish carpentry
difficulty: moderate to difficult
basic framing knowledge and door installation techniques are required.
Day 1 : the recon
we removed sections of wall to see what the framing looked like and to see if there were any buried electrical or plumbing that would surprise us. As you can see in this picture there was no header for the 6ft wide single pain picture window, there was also no corner framing at all, the window held up the house.

still Day 1
Due to having no header in the wall I knew we were going to have to build a temp wall to hold the roof while we build a new exterior wall, I began removing the ceiling tiles and discovered duct tape was used to hold the ceiling together.

Day 2
major destruction and cleaning
This day we did alot of work to tear out the wall, you can see the temporary wall behind "King" jeffy. This was a huge mess and we were very happy to have this much done, the original plan was take this part of the wall down and add a patio door but once we got it out we discovered there was no corner framing or headers so we decided to just keep tearing more wall until the whole corner was opened up 8 ft from the corner in both directions.


in this picture we began the framing starting in the corner.

this picture shows the framing complete and correct, we felt much more secure with good framing in the corner we took out the temp wall to give us more room to work, we did the complete tear out and re-frame of this wall before noon on day 2.

just to prove I was here and working. I like dewalt.

the patio door fit like a glove, we got it squared and shimmed and tacked in place in about 1 hour. we put the frame up first then istalled the door panels after the frame was secured. you can see clearly the header that was never installed over the window, you can also see the other window which was day 3's project.

As you can see the sun is starting to set on DAY 2 activities, this is how far we got in one day. I ran out of the sealing tape so I had to wait until day 3 to get more and finish sealing the door. Not bad for one days work.

Jeff had to leave to catch a brewer game so my friend Colin came over to help me clean up a little before day 3. just to prove he was there I added this picture.

DAY 3
3 hours after day 3 started we had the old wall out and had begun to reframe, here is Jeff once again inspecting my framing ability.

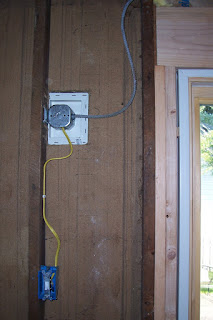
by the end of day 3 the wall was framed, a new double pain Anderson window was installed and the insulation was complete. I did find a buried over-the-stove fan behind the wall which I removed and put in a standard electrical box with a new outlet.

DAY 4: the next weekend
I had to work all week so I didn't get much done, but the next weekend was siding, all the siding got installed and the outside of the house was sealed, just in time too because about 2 weeks after this we got our first night below 40 degrees and 2 weeks later our first snow fall.


added a few accessories

DAY 6 and 7 the following weekend
Added a bit of drywall.


BAM all done.


I want to give a special thanks to Jeff and Colin for all there help, without them this project would have never gotten done as quick as it did. Becky, thanks for being patient while I improved our home. And to Home Depot for supplying me with the knowledge and material to do this project myself.
I hope you enjoyed this blog come back soon.
future blogs will include:
-bottling of my first batches of wine
-the beginning of new batches
-renovating 3 bathrooms
-renovating 2 more exterior walls (opposite side of the house as the above post)
-installing a deck
this post outlines a remodel project that I did in which I have installed a patio where a large picture window once was. This project continued to push my patience as well as my budget. As with any older home every time I would go deeper I would find more things wrong, but this was still a great weekend project.
basic tools: if you have it you will need it almost every tool I owned went into this one.
time frame: 2 weeks
this project took me one hard weekend and a few extra days for drywall and muding and sanding and painting and other finish carpentry
difficulty: moderate to difficult
basic framing knowledge and door installation techniques are required.
Day 1 : the recon
we removed sections of wall to see what the framing looked like and to see if there were any buried electrical or plumbing that would surprise us. As you can see in this picture there was no header for the 6ft wide single pain picture window, there was also no corner framing at all, the window held up the house.

still Day 1
Due to having no header in the wall I knew we were going to have to build a temp wall to hold the roof while we build a new exterior wall, I began removing the ceiling tiles and discovered duct tape was used to hold the ceiling together.

Day 2
major destruction and cleaning
This day we did alot of work to tear out the wall, you can see the temporary wall behind "King" jeffy. This was a huge mess and we were very happy to have this much done, the original plan was take this part of the wall down and add a patio door but once we got it out we discovered there was no corner framing or headers so we decided to just keep tearing more wall until the whole corner was opened up 8 ft from the corner in both directions.


in this picture we began the framing starting in the corner.

this picture shows the framing complete and correct, we felt much more secure with good framing in the corner we took out the temp wall to give us more room to work, we did the complete tear out and re-frame of this wall before noon on day 2.

just to prove I was here and working. I like dewalt.

the patio door fit like a glove, we got it squared and shimmed and tacked in place in about 1 hour. we put the frame up first then istalled the door panels after the frame was secured. you can see clearly the header that was never installed over the window, you can also see the other window which was day 3's project.

As you can see the sun is starting to set on DAY 2 activities, this is how far we got in one day. I ran out of the sealing tape so I had to wait until day 3 to get more and finish sealing the door. Not bad for one days work.

Jeff had to leave to catch a brewer game so my friend Colin came over to help me clean up a little before day 3. just to prove he was there I added this picture.

DAY 3
3 hours after day 3 started we had the old wall out and had begun to reframe, here is Jeff once again inspecting my framing ability.

by the end of day 3 the wall was framed, a new double pain Anderson window was installed and the insulation was complete. I did find a buried over-the-stove fan behind the wall which I removed and put in a standard electrical box with a new outlet.

DAY 4: the next weekend
I had to work all week so I didn't get much done, but the next weekend was siding, all the siding got installed and the outside of the house was sealed, just in time too because about 2 weeks after this we got our first night below 40 degrees and 2 weeks later our first snow fall.


added a few accessories


DAY 6 and 7 the following weekend
Added a bit of drywall.


BAM all done.


I want to give a special thanks to Jeff and Colin for all there help, without them this project would have never gotten done as quick as it did. Becky, thanks for being patient while I improved our home. And to Home Depot for supplying me with the knowledge and material to do this project myself.
I hope you enjoyed this blog come back soon.
future blogs will include:
-bottling of my first batches of wine
-the beginning of new batches
-renovating 3 bathrooms
-renovating 2 more exterior walls (opposite side of the house as the above post)
-installing a deck
Thursday, April 8, 2010
Zen Hockey - the art of stress reduction - 1 of 20
Zen hockey is a concept that I came up with to help good players become great.
Its made up of 2 different philosophies that I have experienced in my life. The first is meditation and relaxation, this was a class I had in college which taught the importance and techniques to stay calm under pressure and lower stress. The second philosophy came from the thrill of coaching hockey for the past 7 years, as well as playing most of my life. I was a goal tender when I developed this system. It started for goalies to help with focus before a game and during practice, it was called zen goal tending, The following posts will go more into that system and extend to all aspects of life. enjoy and come back soon.
Its made up of 2 different philosophies that I have experienced in my life. The first is meditation and relaxation, this was a class I had in college which taught the importance and techniques to stay calm under pressure and lower stress. The second philosophy came from the thrill of coaching hockey for the past 7 years, as well as playing most of my life. I was a goal tender when I developed this system. It started for goalies to help with focus before a game and during practice, it was called zen goal tending, The following posts will go more into that system and extend to all aspects of life. enjoy and come back soon.
Subscribe to:
Comments (Atom)